Edit Your Own YouTube Video Captions
We recommend professionally captioning your videos. However, if you do not have the budget available to professionally caption your videos, there are tools available within YouTube that you can use to caption your own videos. These tools also make it possible to upload existing caption or transcript files, if you have them.
Go to Video Subtitles Page
Go to Your Video.
While logged into YouTube, go to the video you want to work on and click “Edit Video” (below the video).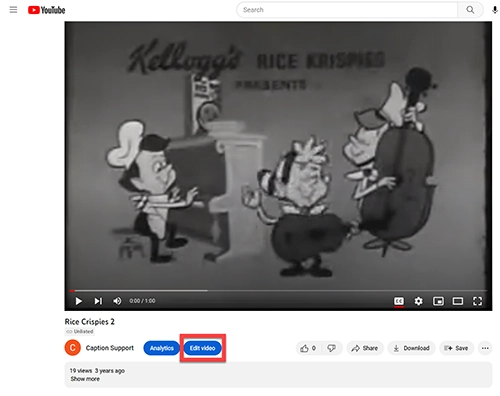
You can also search for the video in YouTube Studio.
Go to Subtitles.
In the left navigation, select “Subtitles”: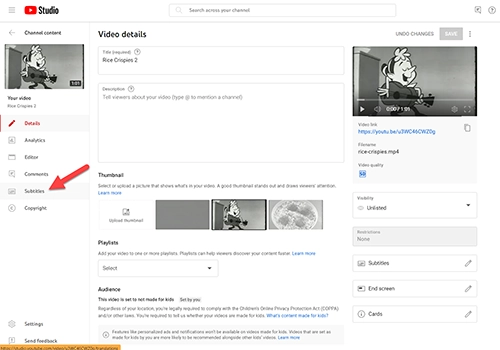
If prompted, set the desired language and select “Confirm”.
Edit the Automatic Caption File
For videos that are hosted on YouTube, there is usually an auto-generated caption file that you can start with. It’s important to edit this file to ensure that it is accurate enough to meet accessibility standards.
Review Caption Standards.
Before you get started, become familiar with the USU Captioning Quality Standards.
Select the Automatic Caption File.
Find the automatically created, inaccurate “English (Automatic)” caption file and click “Duplicate and Edit” to create a new file that you can edit.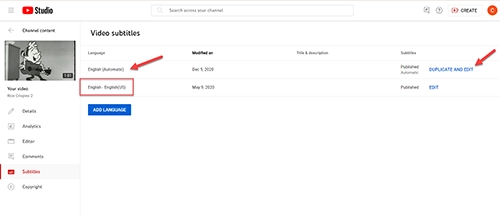
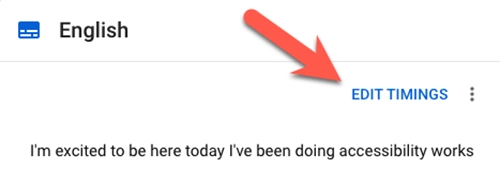
Edit the Caption File.
Click “Edit Timings”. The default mode, “As Text”, won’t let you edit the timings, so it’s not recommended to edit in it.
Fix Errors and Add Punctuation.
We recommend starting by making sure the text is accurate and adding missing punctuation. Refer back to the USU Captioning Quality Standards as needed.
Adjust Timing.
Usually YouTube does a great job making sure the text aligns with the audio. However, if needed, you can adjust the timings in a couple of ways:
- Manually entering times in the boxes on the right side of the text.
- Sliding the text boxes to the corresponding time at the bottom of the caption box.
Publish.
After you have finished and reviewed your video, click “Publish” in the top right corner. Nice work!Notes on Editing Captions
- If you are editing the automatic captions and there are lots of errors, it may be easier to delete the file and start from scratch.
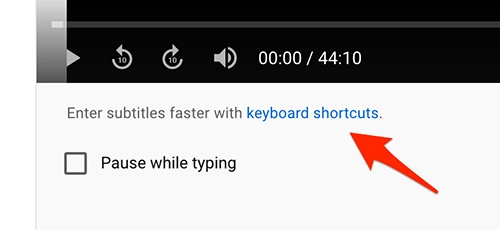
- A link to some helpful keyboard shortcuts can be found in the caption editor:
Uploading Captions Using YouTube
A caption file is basically just a text file. If you already have a transcript or caption file of your video, or want to use a non-speech caption file, you can upload it directly to YouTube.
Upload a Transcript or Caption File
- From the Video Subtitles Page, click the “Add Language” button.
- Select “English” or the appropriate language.
- Select “Add” under the Subtitles column next to the language you just added:

- For Caption files:
- Click “Upload file”
- Select "With timing”
- Upload your file.
- You will be taken to the caption editor where you can review and publish.
- For transcripts:
- You can select “Upload File and select “Without timing” or
- Select “Auto-sync” and paste the text directly. You will then need to review the caption timings.
Non-Speech Captions
If you have a video without any speech, it is still important to add captions per the Non-Speech Elements guidelines (found in the Caption Quality Standards). You can do this a couple of ways:
Use a Sample Caption File
- Download a sample caption file:
- Edit the text as needed.
- Upload it as a caption file using the instructions above.
Manually Create a Caption File
- When adding a file, click “Type manually”.
- Enter the non-speech information and adjust the time to 15 seconds:
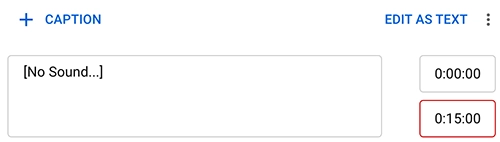
- Click “Publish”.
Additional Resources
- Google’s instructions for adding your own subtitles & closed captions to YouTube videos
- Video: Edit YouTube Automatic Captions