Accessible Podcasts
Podcasts are quickly becoming more and more popular. They’re easy to make, easy to distribute, and easy to listen to. However, due to their audio-only nature, they aren’t accessible to everyone. Deaf and hard-of-hearing people can’t access them at all unless they have transcripts, and others simply have a hard time focusing on audio. Additionally, the digital infrastructure they are hosted on can be inaccessible for keyboard users. Luckily, it’s not that hard to make them accessible! There are three main principles of accessible podcasts: transcripts, accessible websites, and accessible media players.
Transcripts
The easiest thing you can do to increase your podcast’s accessibility is to provide a transcript for it. Not only will it allow deaf and hard-of-hearing people to consume your content, but people who have a hard time focusing on audio can follow along. People who aren’t in a place where they can listen to something can read it instead. If people want to know more about something mentioned in the podcast, transcripts let them know how to spell it. People can also search for terms within your transcript, rather than scrubbing through the audio. Except for the small amount of extra work that it takes to make transcripts, there is no reason not to have them!
Writing a Transcript
There are many ways to get a transcript for your podcast. You can write it out by hand, generate an auto transcript and edit it, or pay someone to transcribe it for you. There are three main factors that will influence which one you choose: cost, time, and transcript accuracy.
- If you hand-write your transcript, it will be 100% accurate, because you know what you said and how to spell everything. This option is also 100% free. The main downside to it is that it's very time-consuming.
- If you use a transcription service, it will be mostly accurate, but things might be misspelled and jargon terms might not be accurate. Depending on the service, it could be pretty quick, but you can still expect to wait at least a day. The main downside to this option is the price—it racks up fast.
- If you generate an auto transcript, it will definitely be fast. No matter what technology you choose to use, it shouldn’t take more than an hour to generate a transcript. It likely won't be completely accurate, but it gives you a solid base to edit, so you won't have to create the transcript from scratch.
Both cost and accuracy are going to depend on which transcription service you use. Generally, the more expensive the service, the better the generated transcript will be, though it will never be 100% accurate. When choosing your service, take into account your time, money, and how much editing you’re willing to do.
How to Generate an Automatic Transcript
Transcription Services
If you want to look at using automatic transcription services, the University of Michigan has created an amazing comparison table of different services, along with instructions for using each one. Be sure to check the pricing yourself, though, as some companies have changed theirs since this table was created.
USU does have a negotiated lower price captioning service with 3PlayMedia that you can take advantage of if you are part of the university.
Generate a Transcript From Adobe Premiere
If you are an employee or student of Utah State, you have access to Adobe Premiere, a video and audio editing service. It has a function that will generate captions or transcripts for mp3 or mp4 files. While these are never 100% accurate and should always be manually reviewed, they make a great starting place.
Here are instructions to generate a transcript:
Open Adobe Premiere.
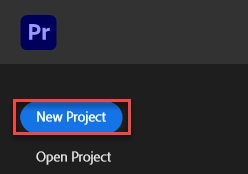
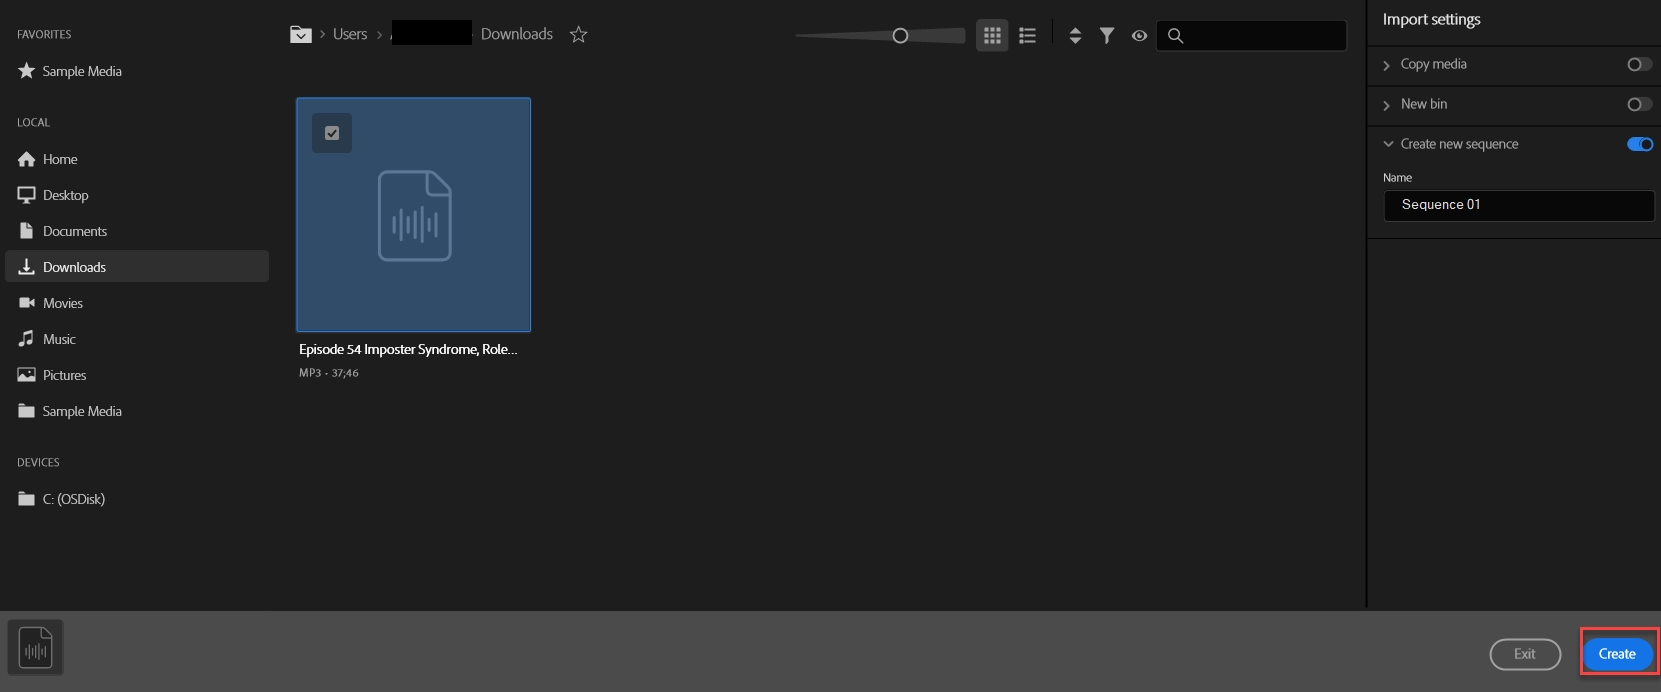
Open Your File.
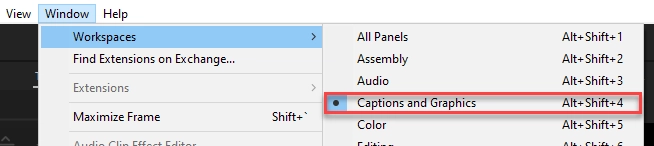
Change Workspace.
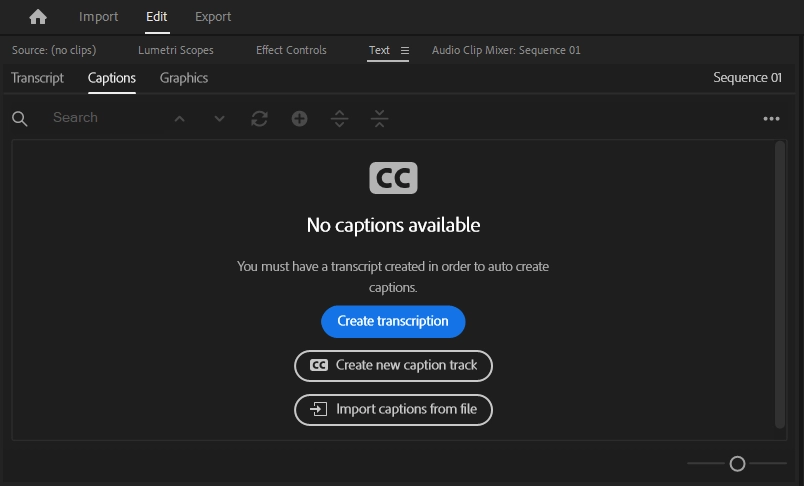
Start Creating a Transcript.
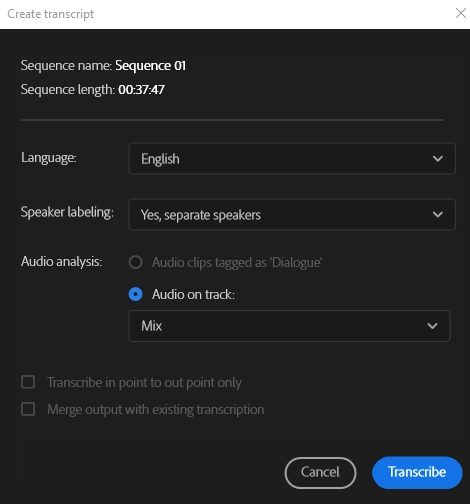
Make sure the language is correct, and have it label separate speakers. Don’t worry about any audio analysis settings.
Create Transcript.
When your transcript is done, the transcript window will open. You can edit it directly in Adobe Premiere, but we recommend downloading it and editing it in a simpler word processor, like Word or Google Docs.
Download the Transcript File.
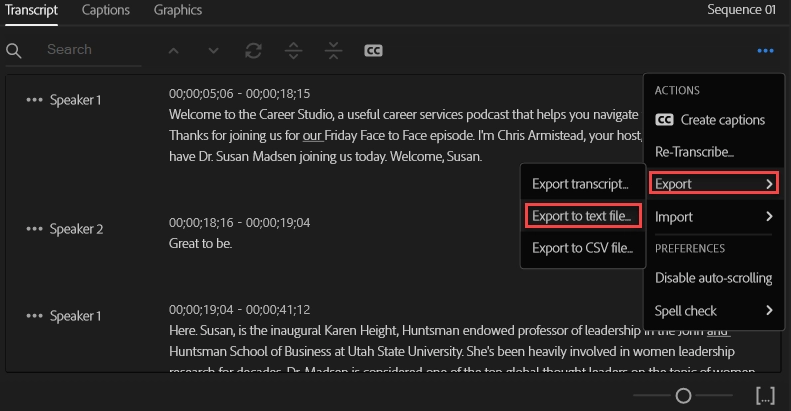
This will take you to your file explorer, where you can choose where it downloads and name it.
Open the File.
Editing Your Transcript for Accuracy
When editing your transcript, you want to make sure that it has the exact same information that someone listening would pick up on. You want it to grammatically match what the speakers say, and you want to include any important sounds that aren’t speech. For the most part, you can use our caption quality standards as guidelines.
For formatting, though, you should follow these transcript-specific principles:
- Label the speaker every time it changes.
- Include time stamps at every speaker change.
- Divide speech into logical paragraphs.
- For example, if one speaker is speaking for a long time, find where the ideas change, and split the paragraphs there.
As long as your transcripts follow these main principles, it will be a good transcript! It can be as pretty or as plain as you want, so long as it makes sense when you read it.
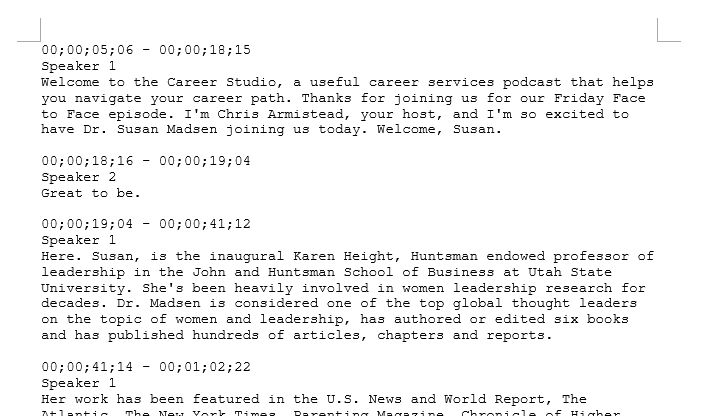
Here’s an example of what a simple edited transcript could look like:
00.00.05
Marissa Armitstead
Welcome to the Career Studio, a USU Career Services podcast that helps you navigate your career path. Thanks for joining us for our Friday Face to Face episode. I'm Marissa Armitstead, your host, and I am so excited to have Dr. Susan Madsen joining us today. Welcome, Susan!
00.00.18
Susan Madsen
Great to be here.
00.00.19
Marissa Armitstead
Susan is the inaugural Karen Haight Huntsman endowed professor of leadership in the Jon M. Huntsman School of Business at Utah State University. She's been heavily involved in women leadership research for decades.
…
Uploading Your Transcript
Make sure that the transcript is as close to the media player as possible so that people can easily find it. Generally, the best place for it is underneath the “show notes,” or podcast description.
There are three different ways that you can add your transcript to your website: uploading the text straight to the website page, attaching a document, or as a synced transcript/captions. When deciding which method to use, consider which functions are allowed on your host website, and what work you’re willing to do. Below are a list of pros and cons for each method:
Uploaded Text
Pros:
- Good for SEO.
- Searchable.
- Most accessible for screen readers.
Cons:
- Can detract from the aesthetics of the website.
Attached Document
Pros:
- Easy to upload.
- Easier to add custom styles.
- Doesn’t take up as much website space.
Cons:
- Doesn’t impact SEO.
- Not always searchable.
- PDFs aren’t always accessible.
- See our page on PDF accessibility to help with this.
Synced Transcript/Captions
Pros:
- Considered the most interactive.
- Provide the best connection between text and audio.
Cons:
- Can be very hard to code, and very time-consuming to sync.
Accessible Website
The next best thing you can do to make your podcast accessible is to make sure the website hosting it is accessible too! You won’t be able to fix third party platforms, but you can fix your own website.
These are some basic principles you can look at to see if your website is accessible:
- Is your website keyboard navigable? Can you use your website without touching your mouse?
- Do you use headings, and are they used correctly? You can view more information on that on our accessible documents page.
- Is there good color contrast on your website? We made a color contrast page outlining exactly how you can make sure it’s good.
- For any images you used, including your podcast cover image, did you add alt text? You can learn the basics of alt text on our webpage.
W3 made a great website accessibility checklist that you can use to evaluate your website!
Media Player
While finding an accessible media player can be difficult, it makes a big difference. What makes a media player accessible is that it is fully keyboard navigable, and labels their buttons in ways that make sense to every user.
Finding an accessible media player is hard because there are very few media players out there that are actually accessible. On top of that, most of the accessible media players require a decent amount of coding ability. Don’t let that discourage you, though!
Here are a couple accessible media players that we found:
- AblePlayer seems to be the most accessible, but requires a fair amount of HTML ability.
- QCast is a paid service, but seems like it takes less HTML knowledge.